 2022-09-27
Arduino IDE in EuroLinux 9 Desktop – server room monitoring
Arduino is an Open Source platform used to build electronic projects. It consists of a programmable board/microcontroller and the IDE software, which is used to write and upload code to the board. In this article, using the Arduino IDE running on EuroLinux Desktop, we will create a simple program to monitor our server room.
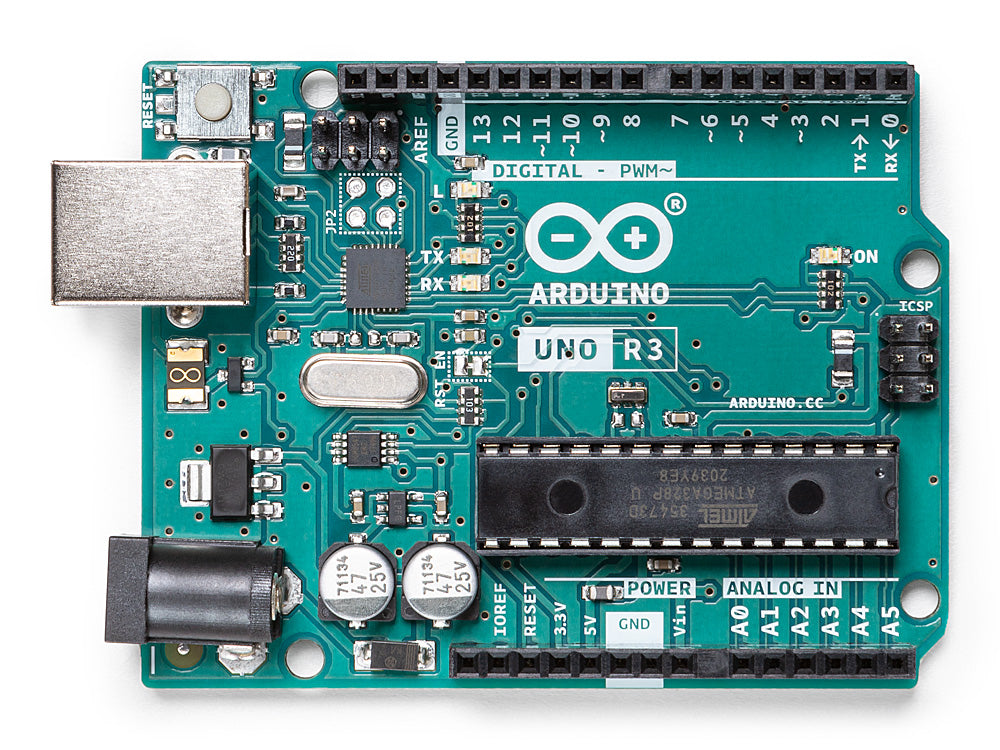
Arduino is an open source platform used to build electronic projects. It consists of both a physical programmable board/microcontroller and IDE (Integrated Development Environment) software, which is used to write and upload computer code to this board.
The Arduino platform has become popular among electronics beginners. Unlike most previous programmable chips, Arduino does not require separate hardware (called a programmer) to load new code onto the board – you can simply use a USB cable. Furthermore, Arduino IDE uses a simplified version of the C++ language, making it easier to learn programming.
Arduino hardware and software is designed for hobbyists, designers, artists and anyone interested in creating interactive objects and environments. Arduino can work with buttons, LEDs, engines, speakers, GPS devices, cameras, the Internet, and even a smartphone or TV, i.e. most of the available hardware and peripherals.
This flexibility, combined with the fact that Arduino software is free, hardware boards are fairly cheap, and both software and hardware are easy to learn, has led to the creation of a large community of users. It has created code for a huge number of open Arduino-based projects.
Today, using the Arduino IDE running on EuroLinux Desktop, we will take a look at creating a simple program that will monitor our server room using the MQ-2 smoke and flammable gas sensor and the DHT11 temperature and humidity sensor.
How to program an Arduino board?
The Arduino IDE is open source software that is written in Java and runs on various platforms: Windows, Mac and Linux. The IDE allows you to write code in a special environment with syntax highlighting and other features that make coding easy, and then easily load the code into your device with a simple click of a button.
A program written using the IDE for Arduino is called a “sketch.” A typical Arduino sketch in C/C++ consists of two functions that are compiled and combined with the main() function into a cyclic executable program:
- setup() – a function that runs once at the beginning of a program, which initializes settings
- loop() – a function called repeatedly until the board is turned off.
Having this basic information, we can proceed to the next step, which is to install the development environment.
Installing Arduino IDE in EuroLinux 9 Desktop
Note – the tutorial was written for Arduino IDE version 1.8. The installation process for the current version 2.0 may have changed.
To be able to program an Arduino, first download the compressed IDE archive from https://www.arduino.cc/en/software, selecting the Linux 64-bit version.
Then launch a terminal and extract the IDE archive with the command:
tar -xf arduino-*.tar.xzNow move the directory of the IDE to your home directory:
mv arduino-*/ ~/and change to this directory:
cd ~/arduino-*/Before the next step, let’s make sure we have the java-11-openjdk package installed. If not – let’s install it with the command:
sudo dnf install java-11-openjdkOnly at this point is it possible to properly install the Arduino IDE environment, which is done by executing the command:
sudo ./install.shOnce the installation process is complete, you still need to remove the java directory, which is located in the current directory:
rm -rf javaWe also need to add our user to the dialout group, which will give us access to the port on which our Arduino is running:
sudo usermod -aG dialout $USERAfter this operation, a reboot is required.
Now we can run the Arduino IDE on EuroLinux Desktop simply by selecting the Arduino IDE application from the list of available programs.
Depending on your preference, you can choose the day or night version of the environment in EuroLinux Desktop by clicking the moon icon in the lower right corner of the screen:
Assembly and project activation
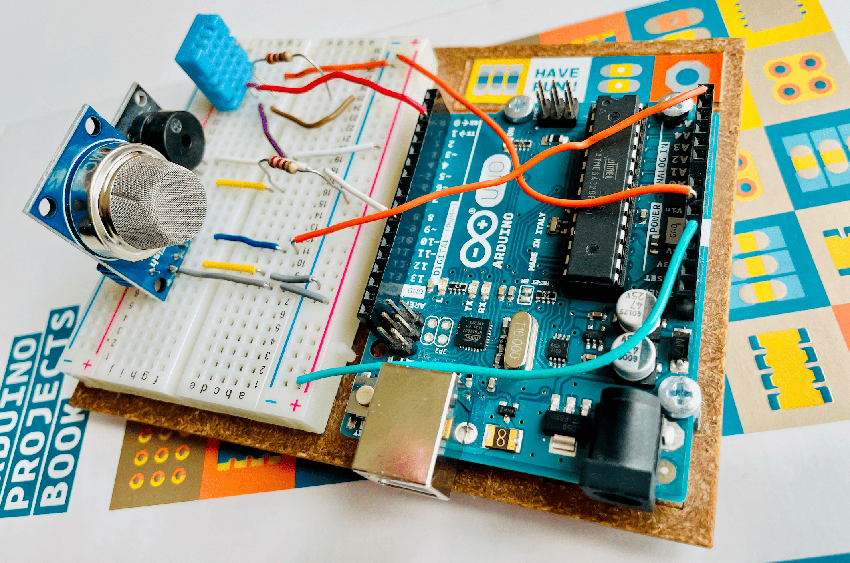
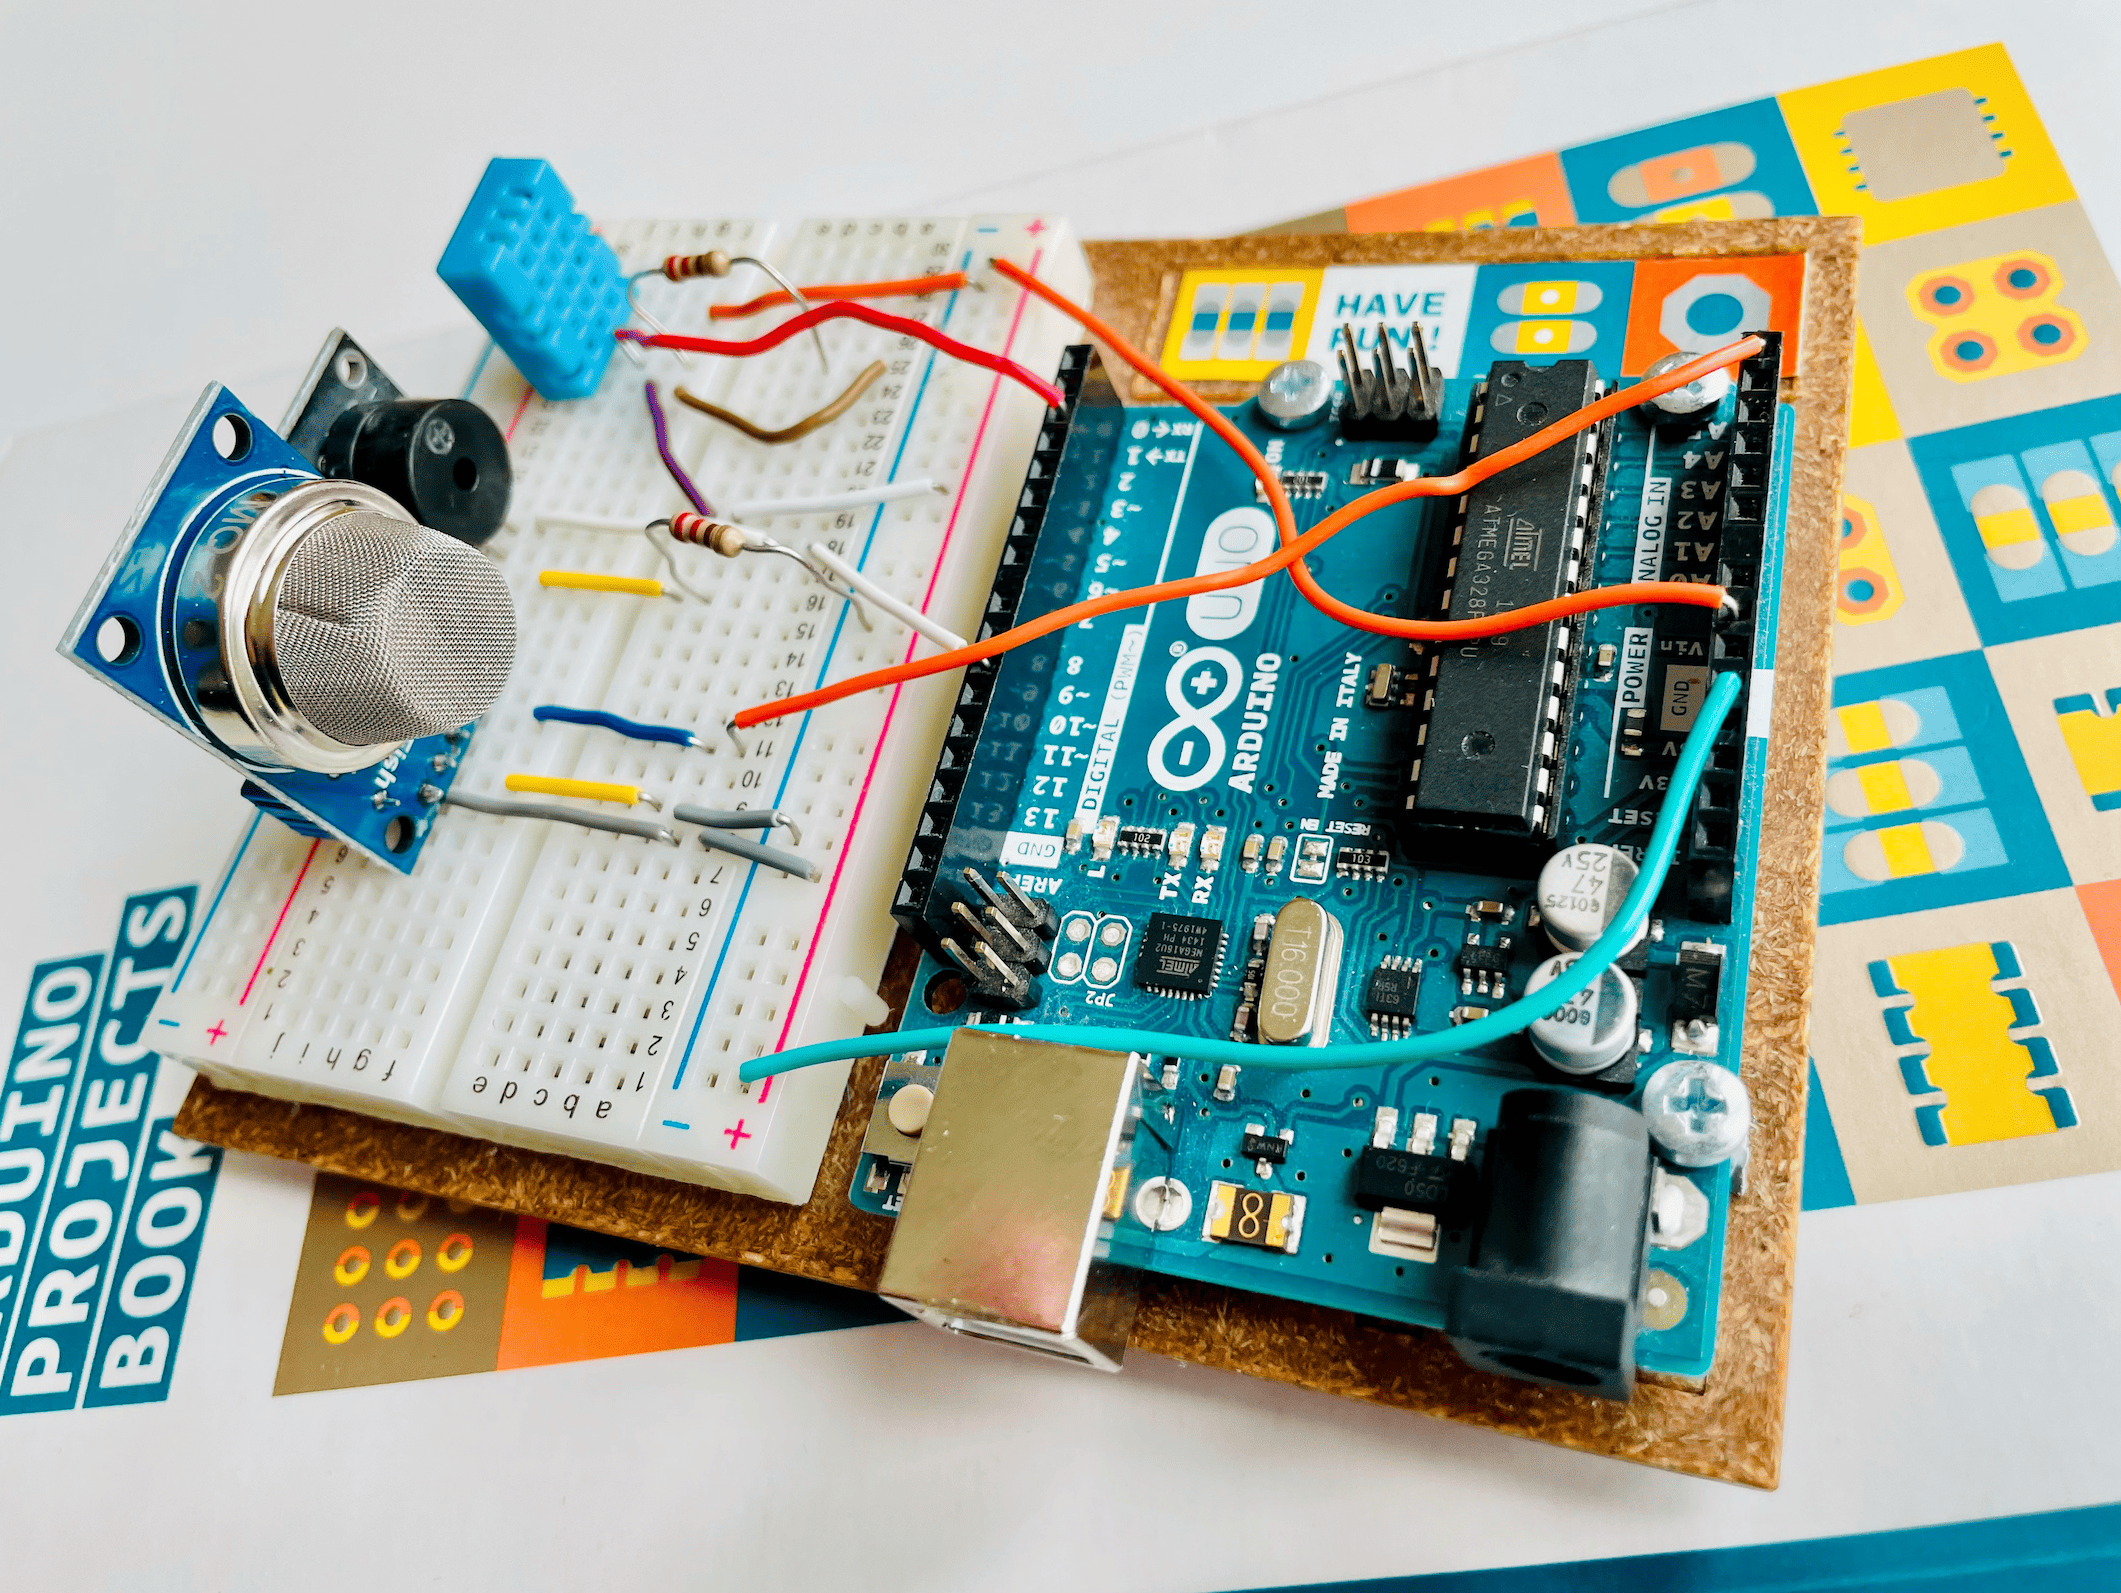
If the IDE application works correctly, we can proceed to assemble the board based on the following diagram:

In the project we use the most popular 220Ω resistors and a classic prototype board. The end result should look similar to the picture:
We can now move on to program the board. First, we need to add a library to support the DHT11, DHT21 and DHT22 temperature sensors.
This will be done from the menu Sketch → Include Library → Manage Libraries → in the search window, type dht and select the library from the list below: DHT sensor library by Adafruit.
We install the above library and all its dependencies.
We activate the port that communicates with Arduino by selecting Tools → Port → /dev/ttyACM0 from the menu
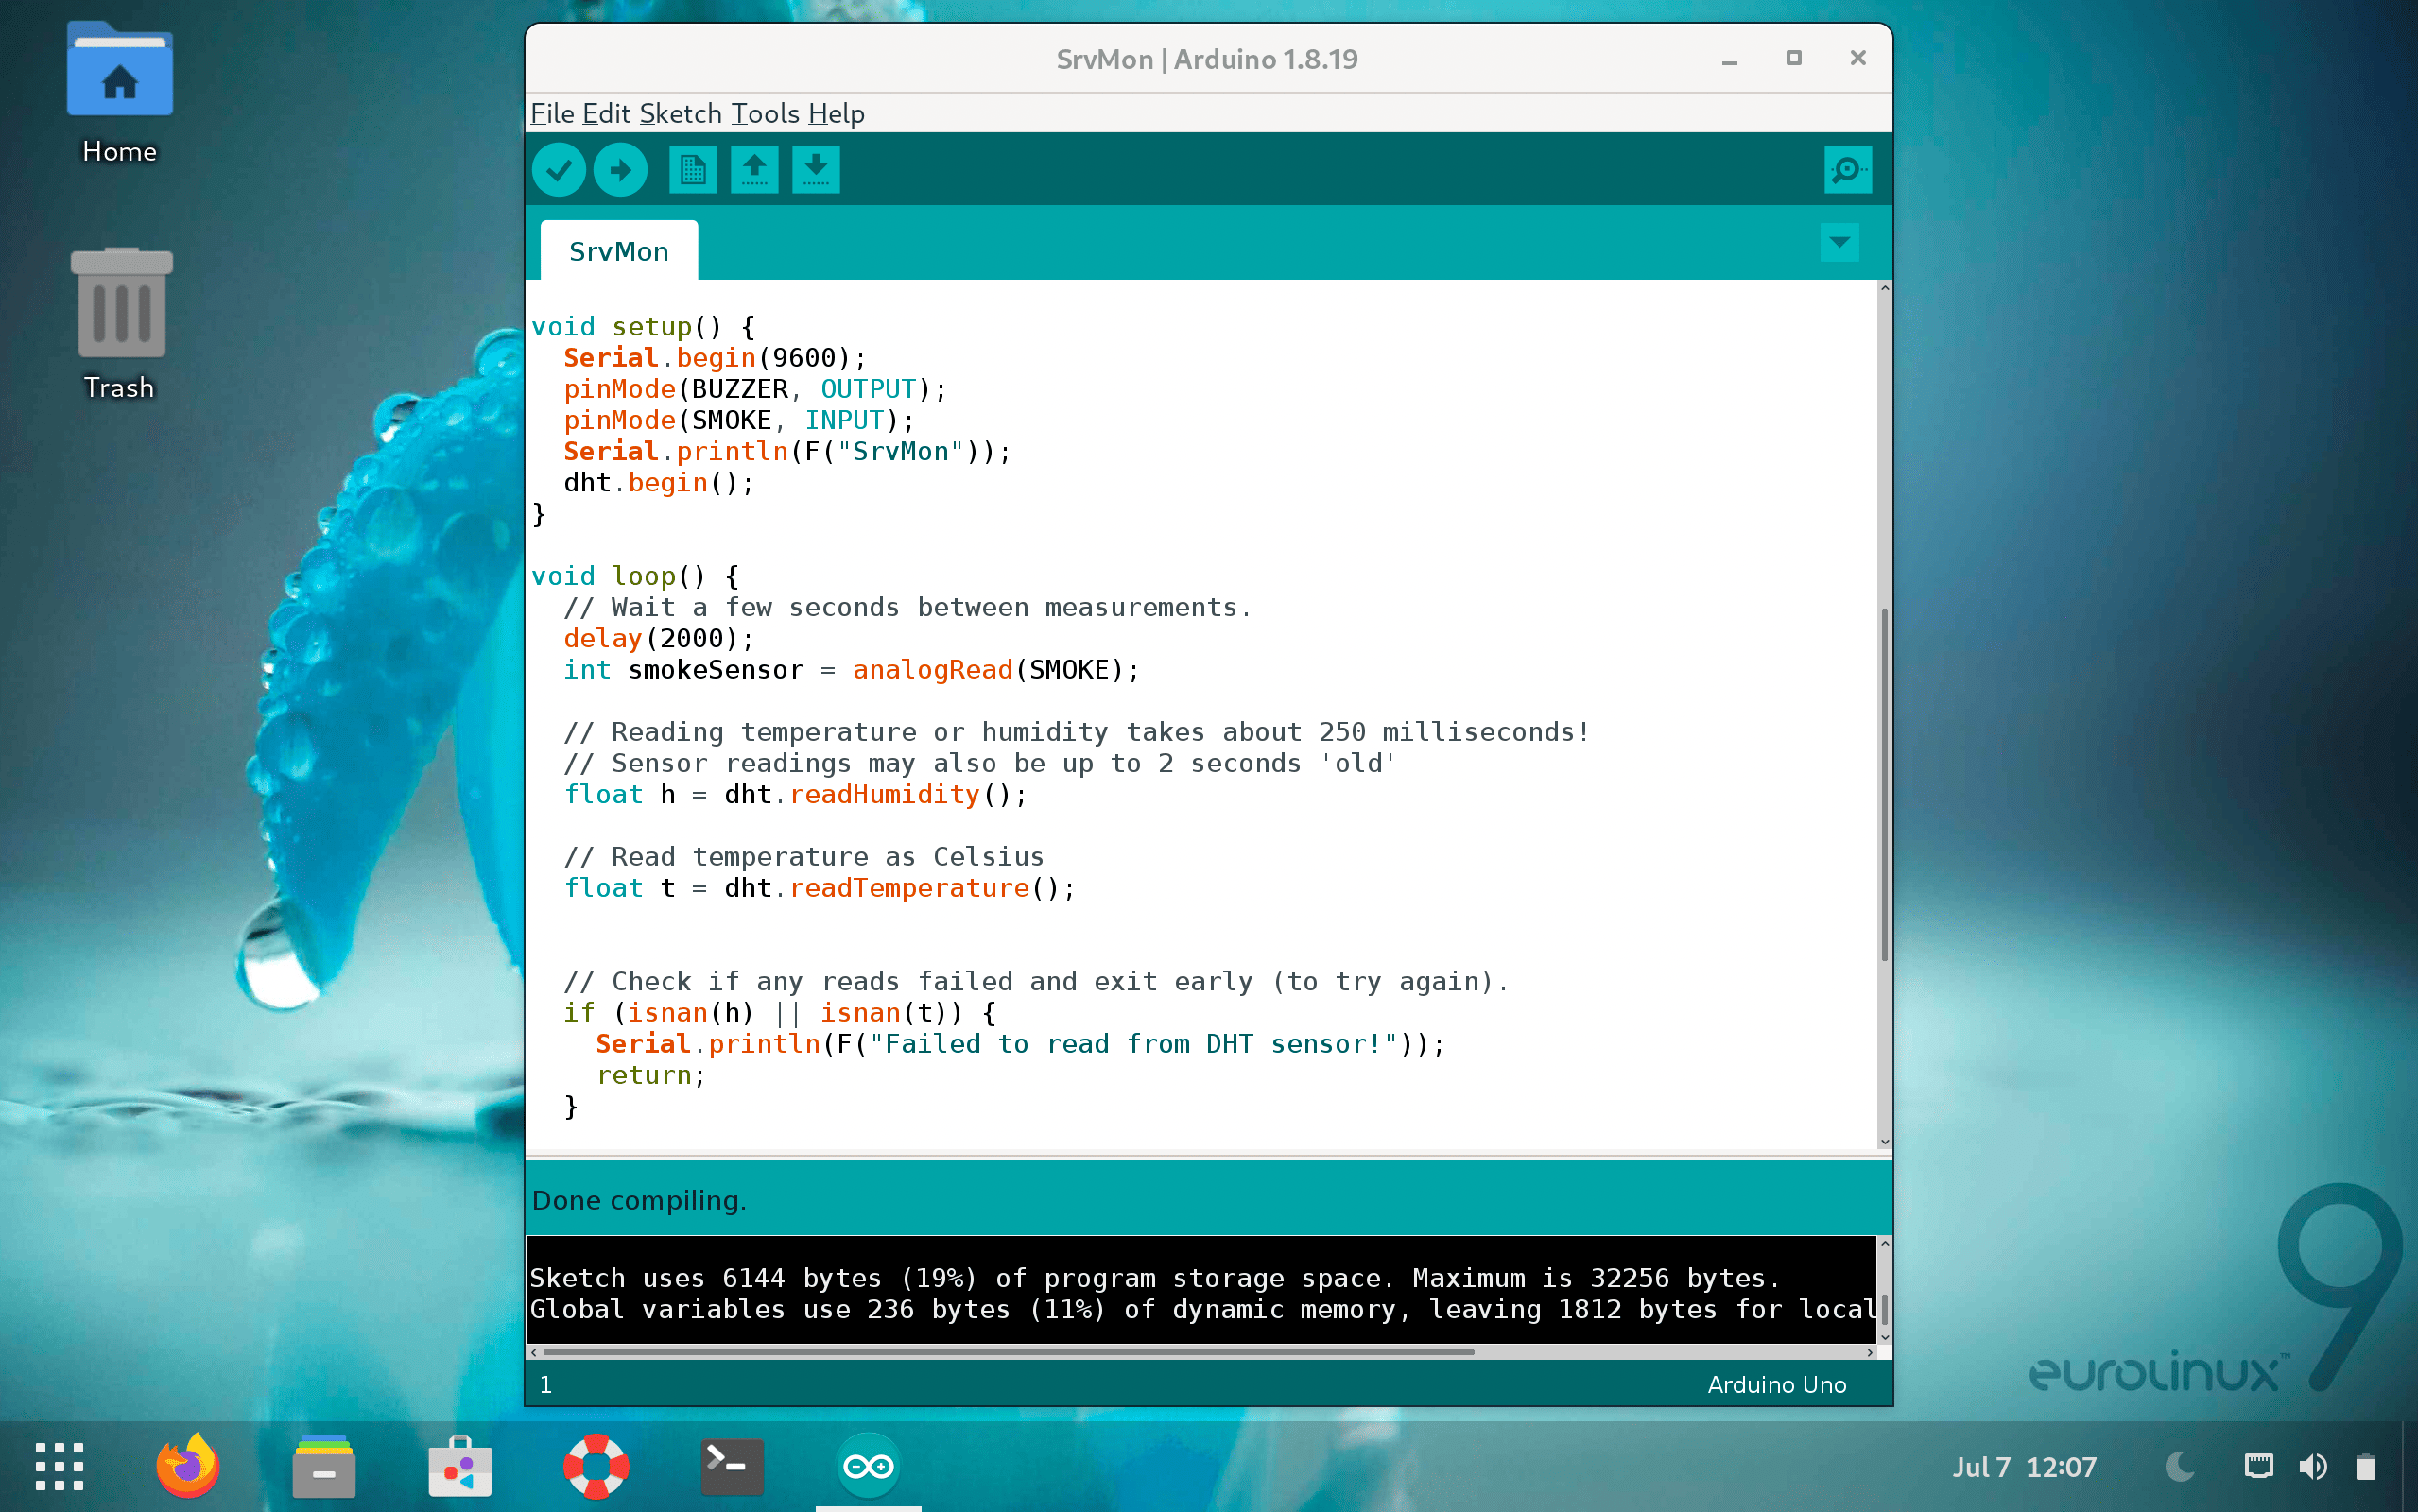
In the Arduino IDE, we paste the finished sketch below, compile it with the button in the upper left corner, and if everything went correctly, we send it to Arduino with the button located right next to the previous one for compilation.
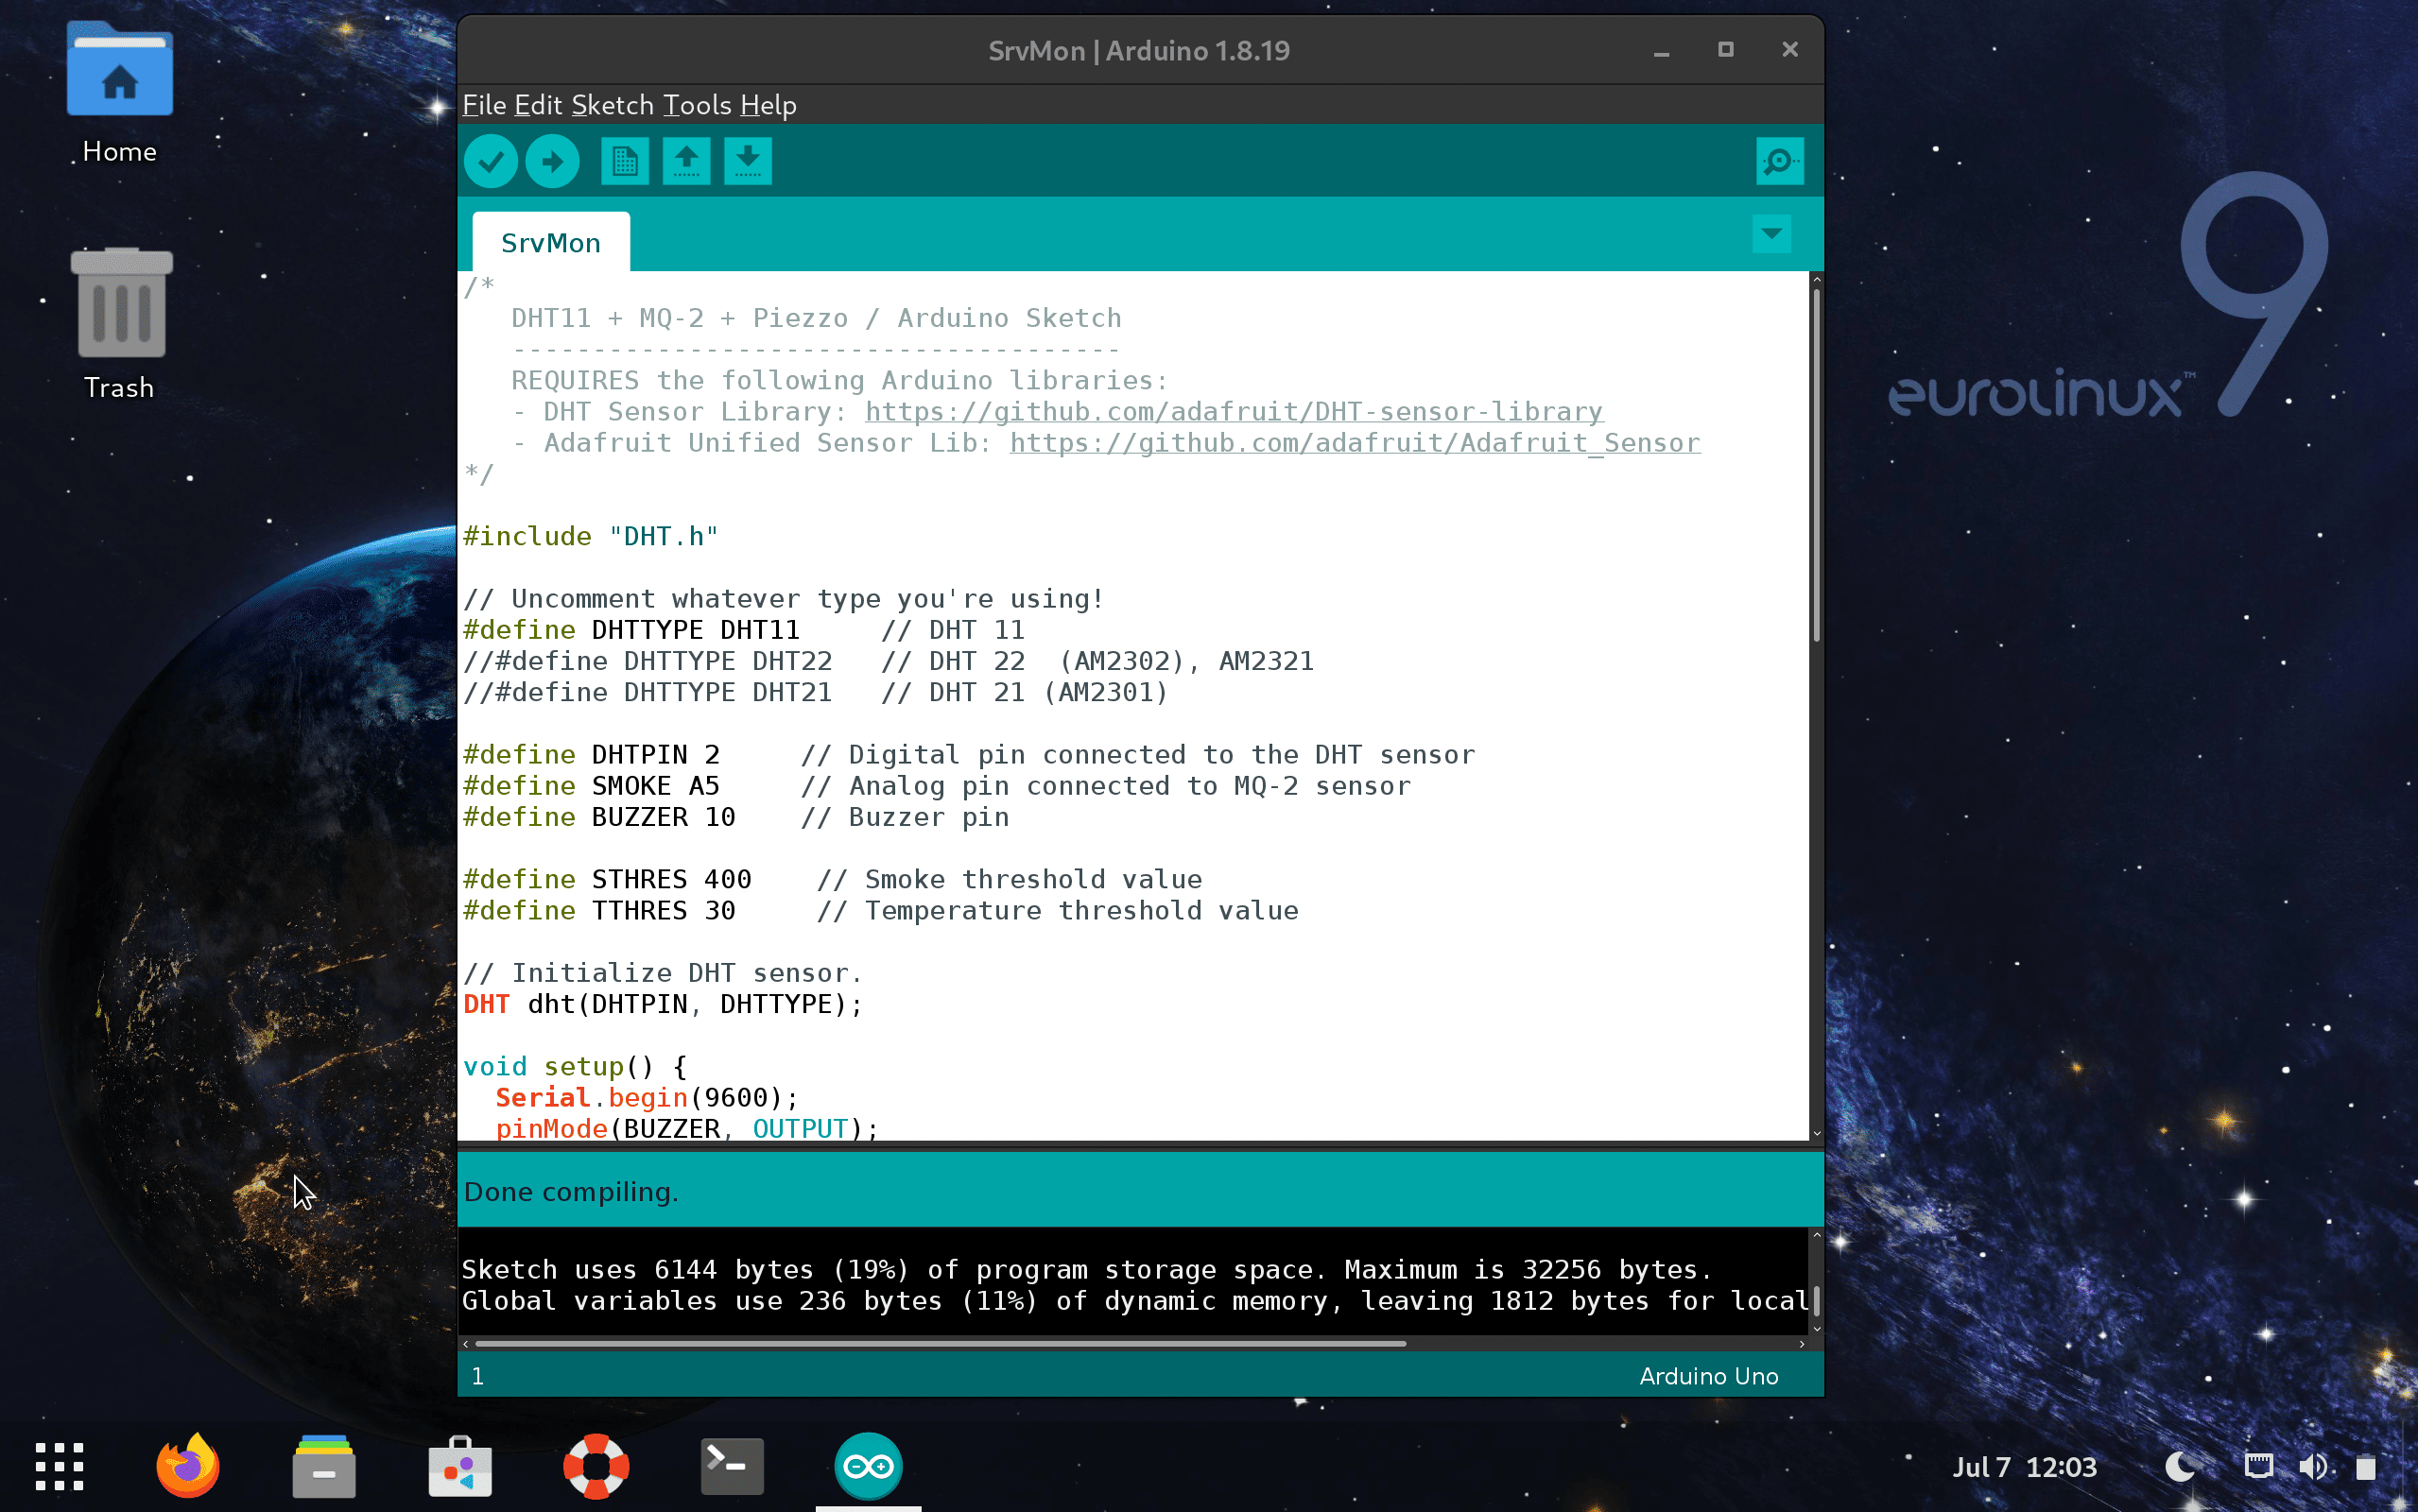
/*
   DHT11 + MQ-2 + Piezzo / Arduino Sketch
   --------------------------------------
   REQUIRES the following Arduino libraries:
   - DHT Sensor Library: https://github.com/adafruit/DHT-sensor-library
   - Adafruit Unified Sensor Lib: https://github.com/adafruit/Adafruit_Sensor
*/

#include "DHT.h"

// Uncomment whatever type you're using!
#define DHTTYPE DHT11   // DHT 11
//#define DHTTYPE DHT22   // DHT 22  (AM2302), AM2321
//#define DHTTYPE DHT21   // DHT 21 (AM2301)

#define DHTPIN 2     // Digital pin connected to the DHT sensor
#define SMOKE A5     // Analog pin connected to MQ-2 sensor
#define BUZZER 10    // Buzzer pin

#define STHRES 400    // Smoke threshold value
#define TTHRES 30     // Temperature threshold value

// Initialize DHT sensor.
DHT dht(DHTPIN, DHTTYPE);

void setup() {
  Serial.begin(9600);
  pinMode(BUZZER, OUTPUT);
  pinMode(SMOKE, INPUT);
  Serial.println(F("SrvMon"));
  dht.begin();
}

void loop() {
  // Wait a few seconds between measurements.
  delay(2000);
  int smokeSensor = analogRead(SMOKE);

  // Reading temperature or humidity takes about 250 milliseconds!
  // Sensor readings may also be up to 2 seconds 'old'
  float h = dht.readHumidity();

  // Read temperature as Celsius
  float t = dht.readTemperature();


  // Check if any reads failed and exit early (to try again).
  if (isnan(h) || isnan(t)) {
    Serial.println(F("Failed to read from DHT sensor!"));
    return;
  }

  Serial.print(F("Temperature: "));
  Serial.print(t);
  Serial.print(F(" °C    "));
  Serial.print(F("Smoke: "));
  Serial.print(smokeSensor);
  Serial.print(F("    "));
  Serial.print(F("Humidity: "));
  Serial.print(h);
  Serial.println(F(" %"));

  if (smokeSensor > STHRES or t > TTHRES) tone(BUZZER, 1000, 200);
}
If the compilation and uploading processes of the program to the board were successful, directly from our Arduino we can now preview the values of three variables: air temperature, smoke and humidity. We will do this in the Arduino IDE from the Tools → Serial Monitor menu. The computer will send a SrvMon message to the Arduino and, as a result, we should get the data of these three values updated every two seconds:
Temperature: 26.10 °C Smoke: 27 Humidity: 42.00 %
Temperature: 26.10 °C Smoke: 27 Humidity: 41.00 %
Temperature: 26.10 °C Smoke: 27 Humidity: 42.00 %
Temperature: 26.10 °C Smoke: 27 Humidity: 42.00 %
Temperature: 26.10 °C Smoke: 26 Humidity: 42.00 %
Temperature: 26.10 °C Smoke: 26 Humidity: 42.00 %
If the value of the variable Smoke exceeds 400, it means that smoke is present in the room and an intermittent beep will be activated. It will also be played if the temperature exceeds 30 degrees Celsius. Of course, these are the default values – you can experiment with these settings using the STHRESH and TTHRES variables for smoke and temperature, respectively.
Process control
Now all that remains is a scripted, systematic reading of this data by the server, for example, every 30 seconds. We will use a simple bash script for this task. Notification if smoke is detected or if the temperature is too high will be sent via Slack messenger:
#!/bin/bash

# Temperature threshold value
TTHRES=30
# Smoke threshold value
STHRES=400
# Time gap between Slack messages
SLACK_SLEEP=5
# Time gap between checks
BREAK=30

function Slack () {
`curl -s -X POST -H 'Content-type: application/json' --data "{'text':'$1'}" https://hooks.slack.com/services/T01GNQECZT7/B01J837URLH/uQuAjfoejsfJpIO`
}

stty 9600 -ixon icanon </dev/ttyACM0
while true; do
    MES=$(head -2 /dev/ttyACM0 | grep Temp)
    TMP=$(echo $MES | cut -f 2 -d' ')
    SMG=$(echo $MES | cut -f 5 -d' ')
    TMP=$(printf '%.0f' $TMP)
    [[ "$SMG" -gt "$STHRES" ]] && \
        Slack "Fire in the server room !!" && sleep $SLACK_SLEEP
    [[ "$TMP" -gt "$TTHRES" ]] && \
        Slack "High temperature - DevOps are mining Ethereum again !!"
    sleep $BREAK
done
The answer to the questions of whether, how and why to connect our Arduino directly to the Internet and bypass communication through the server, I already leave to our readers.
Summary
The Arduino IDE software is easy to use for beginners, yet flexible enough for advanced users. It runs on Mac, Windows and Linux – including computers running EuroLinux 9 Desktop. In addition to the ease of programming enabled by the Arduino IDE, another important feature is the power and capabilities of the AVR microcontroller on which it is based. With a wide selection of low-cost modules, sensors and actuators, there really aren’t many things that can’t be created with Arduino – only our imagination is the limit.