
 2022-09-13
Creating an EuroLinux server in a cloud infrastructure
In this article, we will take a closer look at the process of setting up a EuroLinux server using the command line interface in the world’s largest clouds, such as Amazon Web Services, Microsoft Azure and Google Cloud Platform.
Linux is everywhere – it’s also in the Cloud. In today’s article, we will take a closer look at the process of setting up a EuroLinux server in the world’s largest Clouds using the command line interface.
In the IT world, when we talk about clouds, we mainly mean virtual machines, memory or databases. These are available for purchase in specialized data centers designed for this purpose. Most often they are offered under the IaaS (Infrastructure as a Service) model. Infrastructure created in this way is readily available, can be scaled very easily and is sometimes, though not always, cost-effective. Not surprisingly, more and more companies are using the Cloud. This can be seen very often in the occurrence of failures of these centers. Nevertheless, the trend toward centralization of resources is still well noted.
Clouds also have another, equally useful property – you can use them to try out different options for the development of the company’s structure in a simple and friendly way. For example, having physical servers based on Red Hat® Enterprise Linux®, you can use the Cloud to test the performance of an alternative, less expensive Enterprise-class system.
Overview of the most popular Clouds
The biggest companies providing cloud services are Google Cloud, AWS and Azure. These names come up very often when discussing the best, cheapest or most secure cloud. However, the Chinese proposal, Alibaba Cloud, which, believe the charts, ranks higher than Google Cloud, is rarely mentioned. Let’s take a closer look at the popularity graph of this phrase in Google search.
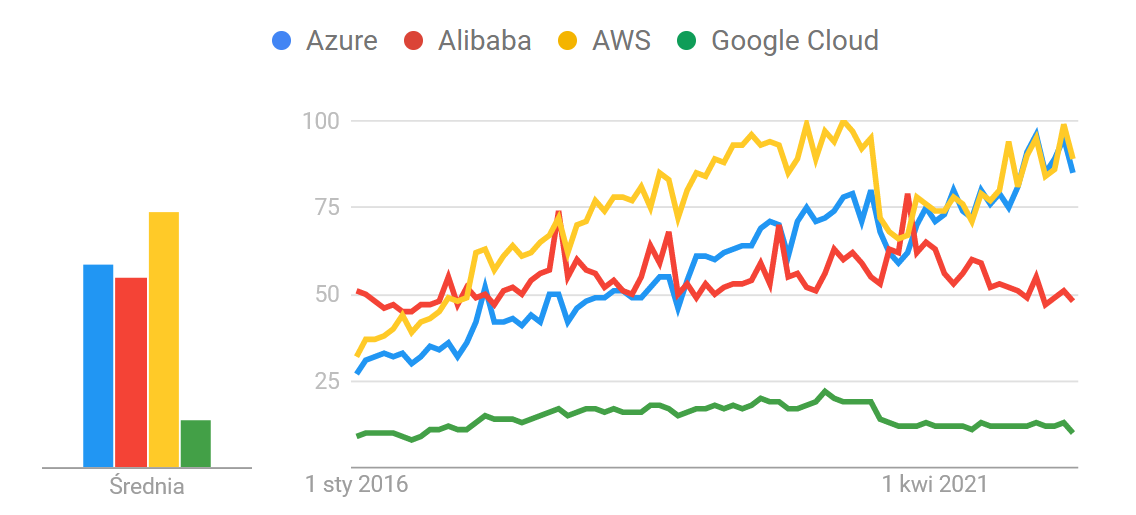
According to Google Trends, the most searched cloud on Google is currently AWS (Amazon Web Services) – yellow, which slightly leads over Microsoft Azure cloud (blue). It is followed by Alibaba (red) and lowest by Google Cloud (green). It should be noted that searches for the phrase Google Cloud Platform or the abbreviation GCP had even fewer searches compared to Google Cloud alone. Google’s appearance in 4th place is probably biased in nature. There are two reasons for this. It is worth noting that Microsoft and Amazon, have created dedicated brands for their cloud services and Google uses a long two-part name and thus loses out in this kind of statistics. On the other hand, typing the word “cloud” in the most popular search engine (i.e. Google) in the first 5 places prompts Google Cloud, which undoubtedly provides additional traffic to this platform.
EuroLinux server in the Cloud
Currently, EuroLinux images are hosted in 3 clouds: Amazon Web Services, Microsoft Azure and Google Cloud Platform. Our team is conducting advanced work so that EuroLinux will soon be available on Alibaba Cloud as well.
By default, a server with the EuroLinux operating system can be set up in two completely different ways – through a browser and filling out a form, and through a command-line interface (CLI). The following guide walks you through the entire process of creating a server, using a suitably adapted CLI.
Amazon Web Services
To start setting up a server on the AWS platform using the CLI, you must first make sure you have an access key ID and secret access key created, in addition to having an account on the AWS platform. Otherwise, follow the instructions on the AWS website.
The next step is to install the appropriate version of AWS CLI compatible with the operating system and its architecture. We can find the details here.
Having the AWS CLI already in place, it is necessary to configure the account. To do this, we call the aws configure command, where we specify the newly created key for the AWS account, the region – for example, us-east-1 – and the format in which it should return information, such as json. A fully configured CLI allows us to control almost all AWS elements accessible from the website. But now let’s take a closer look at the creation of the EuroLinux server itself.
1. The first step will be to obtain the ImageId of interest. To do this, it is most convenient to list all publicly available EuroLinux images using the describe-images command and filter them by name, adding the --filters flag. For readability, we will reduce the resulting description of the images using the grep command.
aws ec2 describe-images --filters "Name=name,Values=centos-eurolinux*" | grep 'ImageId\|Description'2. Having already selected the ImageId, the process of creating the server should start with the creation of a key so that we can connect to the created instance. To create a new key, run the following command, renaming MyKeyPair to your key name. Save the generated key in the MyKeyPair.pem file.
aws ec2 create-key-pair --key-name MyKeyPairAfter the key is created and saved, the access to the MyKeyPair.pem file should be changed:
sudo chmod 400 MyKeyPair.pem3. Another necessary element is security-group, which is created with the command:
aws ec2 create-security-group --group-name MySecurityGroup --description "My default security group"In order to be able to connect to the instance, in addition to the creation of the security-group itself, it is also necessary to give it the appropriate accesses. First, we need to find out what IP address we have. This can be easily checked by typing the command:
curl https://checkip.amazonaws.comWe can then create a rule by changing security-group-id to the appropriate group id and x.x.x.x to the IP address we want to grant access to:
aws ec2 authorize-security-group-ingress --group-id security-group-id --protocol tcp --port 22 --cidr x.x.x.x/324. This way we got all the elements needed to create a EuroLinux server on AWS resources. Run the following command to create one instance on a t2.micro machine:
aws ec2 run-instances --image-id ami-xxxxxxxx --count 1 --instance-type t2.micro --key-name MyKeyPair --security-group-ids security-group-idIt is a good idea to write down for yourself the public IP address where the machine is available.
5. To log in to the server, you need to run a simple ssh command with the previously created key and the machine’s saved public IP address. The default user name varies depending on the version of EuroLinux. The best way to find out which user to choose is to try to log in as root:
ssh -i "MyKeyPair.pem" [email protected]In response, we will receive information similar to this: Please login as the user “cloud-user” rather than the user “root”.
6. We can stop the server with the `aws ec2 stop-instances` command. On the other hand, in a situation where we need to release resources, it is useful to use the terminate-instances command.
Microsoft Azure
Setting up a server on Azure may seem easier than on AWS, although the two clouds have a lot in common. Once you have a Microsoft Azure account, you proceed to install the Azure CLI compatible with your operating system. Detailed installation instructions can be found on Microsoft’s website.
Then log in to the interface with your username and password, just like when you log in to the website. Just type the following command:
az login -u AZURE_USERNAME -p AZURE_PASSWORDAfter logging into the Azure CLI, we have the ability to manipulate resources almost like from a web page. But now, as with AWS, let’s take a closer look at server creation.
1. As before, we first look for a suitable image, specifically its Urn, from which we will create a EuroLinux server. To do this, run the following command (searching for specific images in the entire database can take about a minute):
az vm image list --offer EuroLinux -all --output table2. With a specific EuroLinux image and its Urn selected, the only thing missing is a resource-group, which we will create by running the following command and replacing myResourceGroup with the name of the new resource group. The location can be set as desired:
az group create --name myResourceGroup --location westeurope3. Now, to create a EuroLinux server in Azure Cloud infrastructure, just type the command, first changing the group name, instance name and Urn for the image to the correct one (it’s also worth changing the password to a harder one):
az vm create --resource-group myResourceGroup --name eurolinuxServer --image Urn --authentication-type password --admin-username azureuser --admin-password SecretPassword12345!4. Once you have successfully created a server on Azure, you will see a list with the most important information, including the public IP address of the machine. To log into the server, we will use the aforementioned address by running the following command:
ssh [email protected]Then we enter a password for the user, the same as when we created the server.
5. Once the server work is complete, we can remove it as follows (specifying after the -g flag the name of the resourceGroup, and after the -n flag the machine name given earlier):
az vm delete -g myResourceGroup -n eurolinuxServer –yesGoogle Cloud Platform
EuroLinux images are also available on Google Cloud Platform. To use them and create your own server, you need to install the gcloud CLI console tool compatible with your operating system. See the manufacturer’s website for details.
1. After installing the CLI, you need to configure it. To do this, create an authorization key according to the instructions here, and then use it by calling the following command (replacing my_key.json with the name of the key file):
gcloud auth activate-service-account –key-file=my_key.json2. The next step is to select or create the project in which we will perform the next operations. To create a new project, execute the following line (being in an organization, you need to remember to add the –organization=id_organization flag):
gcloud projects create my-projectOn the other hand, to set the project as the default, call the command in the gcloud CLI:
gcloud config set project my-project3. Once the project has been created correctly, we can create our own server. To do this, we only need the uri of a given image available on Google Cloud Platform. An example uri for EuroLinux 8.6 is: https://www.googleapis.com/compute/v1/projects/eurolinux-cloud/global/images/eurolinux-8-6. To create your own server on Google`s platform, just run the following command, which will create an EuroLinux 8.6 server on the n1-standard-1 machine in the us-central1-a region:
gcloud beta compute instances create eurolinux-server1 --zone=us-central1-a --machine-type=n1-standard-1 --subnet=default --image=https://www.googleapis.com/compute/v1/projects/eurolinux-cloud/global/images/eurolinux-8-6 –boot-disk-size=10GB4. If we want to terminate the newly created machine and delete any changes made to it, we can execute the command:
gcloud compute instances delete eurolinux-server1 –zone=us-central1-aSummary and the future
Nowadays, migrating to cloud infrastructure is a common thing not only for economic reasons, but also due to its ability to better adapt to rapidly changing external conditions. Cloud solutions are also perfect for testing a new system or database structure.
The company EuroLinux creates a secure and cost-effective alternative to RHEL® systems or databases such as Oracle® and we make it available on the world’s largest clouds. This makes it easy to compare the systems you are interested in and choose the one that is most beneficial. In addition to successively making products available on major cloud platforms, we are continuing our activities in more regions of the world. Therefore, in the near future we intend to offer our products through Alibaba Cloud as well.